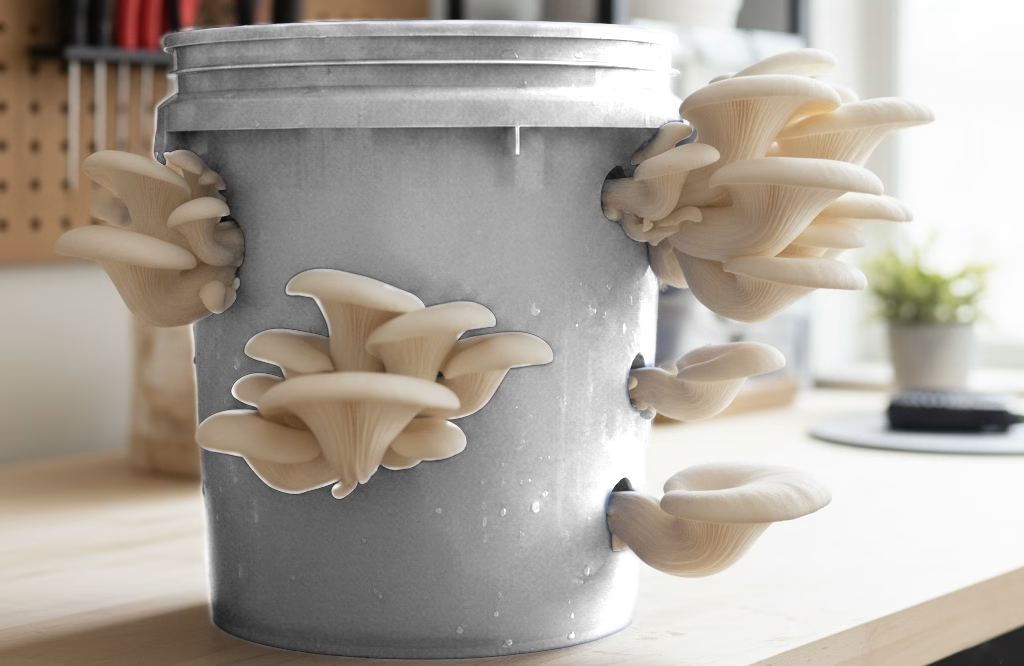
Growing your own gourmet mushrooms at home can feel incredibly intimidating. If you look up standard cultivation methods online, you are instantly hit with a wall of specialized jargon: laminar flow hoods, agar plates, pressure cookers, and sterile laboratory techniques. It is enough to make any aspiring grower give up before they even start.
But here is the good news: Oyster mushrooms (Pleurotus ostreatus) do not care about expensive lab equipment.
Oyster mushrooms are among the most aggressive, resilient, and fast-growing fungi in nature. Because they grow so vigorously, you can skip the sterile laboratory entirely and grow pounds of premium, restaurant-quality mushrooms using a simple, low-tech method right on your kitchen counter or porch: The 5-Gallon Bucket Method.
This comprehensive guide breaks down the exact step-by-step process to transform a standard hardware bucket into a high-yielding mushroom urban farm using cheap, easily accessible materials.
The Supply Checklist
Before starting, gather your materials. You can find almost all of these items at a local hardware store or pharmacy, and the live mushroom cultures are easily sourced online.
-
A 5-Gallon Plastic Bucket (with a tight-fitting lid): Food-grade buckets are ideal, but any brand-new, clean utility bucket works perfectly.
-
A Power Drill: Equipped with a 5/16-inch or 1/2-inch drill bit.
-
Micropore Tape: This is standard, breathable paper medical tape available at any pharmacy. It allows oxygen to flow into the bucket while keeping wild mold spores and insects out.
-
Hardwood Sawdust Pellets: The choice of food for our mushrooms. Use 100% natural, unflavored hardwood pellets—the exact same kind sold cheaply for heating stoves or backyard BBQ pellet grills.
-
Oyster Mushroom Grain Spawn: This is your “seed.” Buy a high-quality bag of Pearl, Blue, or Pink Oyster grain spawn from a reputable online seller.
-
70% Isopropyl Alcohol: For sanitizing your equipment.
Step 1: Prepping the “Mushroom Apartment”
The first step is transforming your standard plastic bucket into a fruiting chamber.
Using your power drill, create holes around the sides of the bucket. Space the holes roughly 4 to 6 inches apart in a staggered grid pattern. Aim for 8 to 12 holes total around the perimeter. These holes serve a dual purpose: they provide ventilation during growth and act as the exit points where your mushrooms will eventually burst out in dense clusters.
Critical Step: Drill 2 or 3 small holes into the absolute bottom of the bucket. If excess water pools at the bottom during incubation, the roots will drown and rot. Proper drainage is essential.
Once drilling is complete, thoroughly wipe down the inside of the bucket, the lid, and your hands with 70% isopropyl alcohol. Let it air dry. To finish prepping, tear off small strips of micropore tape and tape over every single hole on the sides of the bucket.
Step 2: The “No-Equipment” Pasteurization Trick
In professional setups, mushroom growers use massive steam pressure cookers to sterilize their growing medium (called a substrate). We are bypassing that entirely with a brilliant shortcut called Bucket Pasteurization. Because hardwood pellets are subjected to intense heat and pressure during manufacturing, they are already clean. We just need to hydrate them while wiping out any residual surface contaminants.
-
Measure: Place 5 pounds of dry hardwood pellets into a large, clean plastic tote or a separate clean bucket.
-
Boil: Bring 1.2 gallons of clean water to a rolling boil.
-
Hydrate: Carefully pour the boiling water directly over the dry pellets.
Immediately slap the lid on tightly to trap the steam. Let the container sit undisturbed for at least 4 to 6 hours (or overnight). As the pellets absorb the water, they will expand and burst into a beautiful, fluffy, sweet-smelling sawdust.
⚠️ Warning: You must let the sawdust cool down completely to room temperature (below 80°F / 26°C) before moving to the next step. Sowing live mushroom culture into hot sawdust will kill it instantly.
Testing Field Capacity
Before proceeding, grab a handful of the cooled sawdust and squeeze it as hard as you can. You want to achieve field capacity—the ideal moisture level.
-
Perfect: Only a few individual drops of water escape between your fingers, and the sawdust holds its shape in your palm without crumbling.
-
Too Wet: Water runs out in a stream (let it drain or mix in a tiny bit more dry material).
-
Too Dry: No water escapes and the ball falls apart easily (mix in a splash of boiled water).
Step 3: Layering the Mushroom Lasagna
Once your sawdust is cool and perfectly hydrated, it is time for inoculation—mixing the mushroom spawn into the substrate. Put on clean gloves or wash your hands thoroughly. Open your bag of grain spawn and gently massage it from the outside to break the solid block apart into individual, free-flowing grains.
We will pack the bucket using a layering technique to ensure the mushroom roots can easily find the exit holes:
-
Base Layer: Drop roughly 2 inches of loose, moist sawdust into the bottom of your prepared, drilled bucket. Pack it down gently with your hands to eliminate major air pockets.
-
Spawn Layer: Sprinkle a generous handful of the grain spawn over the sawdust, paying extra attention to the perimeter so the grains sit directly against the taped holes.
-
Repeat: Add another 2 inches of sawdust, pack gently, and sprinkle another layer of spawn.
Continue this “lasagna” layering process until the bucket is nearly full, ensuring your final, topmost layer is a thin blanket of sawdust. Press down one final time and snap the bucket lid on tightly.
Step 4: The Incubation Phase
Your bucket is now seeded and ready to incubate. Move the bucket to a dim, warm, indoor space—a closet, pantry, or a quiet corner of a room is perfect. The ideal temperature range for this phase is between 68°F and 75°F (20°C to 24°C).
During this stage, you have absolutely zero maintenance chores. Do not mist it, and do not open the lid.
Over the next 2 to 3 weeks, the mushroom roots (called mycelium) will run aggressively through the sawdust, consuming the nutrients in the wood. If you peek through the translucent plastic or check the holes, you will see a brilliant, bright white, web-like fuzz slowly overtaking the dark brown sawdust.
Once the entire bucket is completely bound together in a solid, bright white block of mycelium, incubation is complete.
Step 5: Triggering the Harvest
To force the fully colonized mycelium to grow actual mushrooms (called fruiting), we need to trick it into thinking it has reached the outside world. Mushrooms decide to fruit based on three environmental triggers: Fresh Air, Ambient Light, and High Humidity.
Move your bucket to a well-lit living area, like a kitchen counter or a shaded balcony. Avoid direct sunlight, which will bake and dry out the culture.
Take a sharp knife and slice a small “X” directly through the paper micropore tape covering the side holes. This sudden exposure to fresh air tells the mycelium exactly where to grow.
The Maintenance Routine
Grab a standard spray bottle filled with clean tap water. Mist the exposed taped holes 2 to 3 times a day. You are not trying to flood the bucket; you are simply keeping those exposed exit points damp and humid.
Within 3 to 7 days, you will notice tiny, dark pin-heads forming inside the cuts of the tape. These are called pins.
Once pins emerge, prepare to be amazed. Oyster mushrooms grow at a breathtaking, almost alien speed. They can easily double in physical size every 24 hours. Keep up your misting routine daily, spraying the growing clusters directly.
Step 6: When and How to Harvest
From the moment pins appear, you are usually only 4 to 5 days away from a harvest.
Knowing exactly when to pick your mushrooms ensures the best culinary texture and shelf life. Look closely at the caps of individual mushrooms within a cluster:
-
Perfect Timing: The edges of the caps are still slightly rolled downward or horizontal.
-
Overmature: The edges of the caps flatten out completely or curl upward, turning into a funnel shape. At this stage, the mushroom begins dropping millions of white, powdery spores, and the flesh becomes slightly woody.
To harvest, grab a whole cluster firmly at its base right against the plastic wall of the bucket. Give it a firm twist and a clean pull. The entire cluster should snap away from the bucket effortlessly.
The Bonus Round: Second and Third Flushes
Do not throw your bucket away after your first harvest! The block of mycelium inside still holds plenty of energy.
Keep misting the empty holes 2 to 3 times a day. Within 10 to 14 days, the mycelial block will re-mobilize its nutrients, and a brand-new crop of mushrooms—called a second flush—will pin and emerge from the exact same holes. A single bucket will reliably yield 2 to 3 flushes before the wood sawdust runs completely out of nutrients, giving you weeks of fresh, home-grown gourmet meals from a single afternoon of effortless setup.